

こんにちは!ゆーや(@yuyamanm118712)です。
こちらのページでは完全独学でWebプログラマとなった私が
デスクトップアプリには必須!!Tkinterで進捗バー(ttk.Progressbar)を表示する方法をご紹介します!
進捗バーはユーザーが作業の進捗を把握するのに必須のウィジェットです!
最後までじっくりと読んで、一緒に学習にしていきましょう。
なお、ご指摘・ご質問はTwitter(@yuyamanm118712)のDMまでよろしくお願いします。
この記事を読むと
- Tkinterで進捗バーが作成できる!
- Tkinterでttk.Progressbarの基本的な使い方について理解できる!
- Tkinterでttk.Progressbarのオプションについて理解できる!
- ttk.Progressbarを使ったサンプルコードが手に入る!
ttk.Progressbarとは
ttk.Progressbarは、タスクの進捗状況を表示するためのウィジェットです!
これは、ダウンロード、ファイルのコピー、データの処理など、時間がかかる処理に対してユーザーに進行状況を示すのに役立ちます!
この記事では、ttk.Progressbarの基本的な使い方やオプションをサンプルコードとともに詳しく解説します!
tkinterの中でもttkモジュールを使うよ!
ttkモジュールについては以下の記事を見てね!

ttk.Progressbarの基本
ttk.Progressbar作成までのサンプルコード
import tkinter as tk
from tkinter import ttk

root = tk.Tk()
root.title("Progressbar-完全独学Python")
root.geometry("500x300")

# Progressbarの作成
progress = ttk.Progressbar(root, orient="horizontal", length=200, mode="determinate")
progress.pack(pady=20)

root.mainloop()
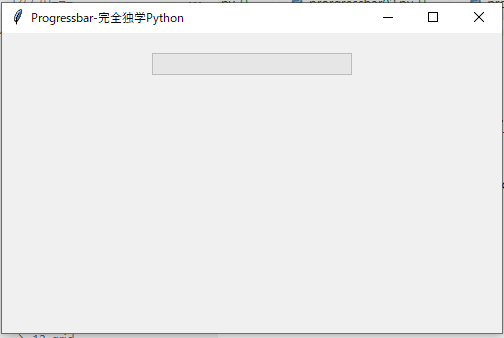
ここまでで進捗バーらしきものが表示されたね!
ここから見た目や動作の設定をしていくよ!
ttk.Progressbarのオプション
Progressbarの方向を指定(orient)
import tkinter as tk
from tkinter import ttk

root = tk.Tk()
root.title("Progressbar-完全独学Python")
root.geometry("500x300")

# 水平のProgressbarを作成
progress_horizontal = ttk.Progressbar(root, orient="horizontal", length=200, mode="determinate")
progress_horizontal.pack(pady=10)

# 垂直のProgressbarを作成
progress_vertical = ttk.Progressbar(root, orient="vertical", length=200, mode="determinate")
progress_vertical.pack(pady=10)

root.mainloop()
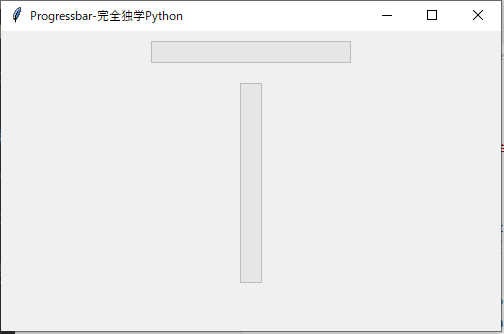
orientは進捗バーの向きを設定できる!
作りたいGUIに合わせて、設定しよう!
Progressbarの長さ(length)
import tkinter as tk
from tkinter import ttk

root = tk.Tk()
root.title("Progressbar-完全独学Python")
root.geometry("500x300")

# 短いProgressbarを作成
progress_short = ttk.Progressbar(root, orient="horizontal", length=100, mode="determinate")
progress_short.pack(pady=10)

# 長いProgressbarを作成
progress_long = ttk.Progressbar(root, orient="horizontal", length=300, mode="determinate")
progress_long.pack(pady=10)

root.mainloop()
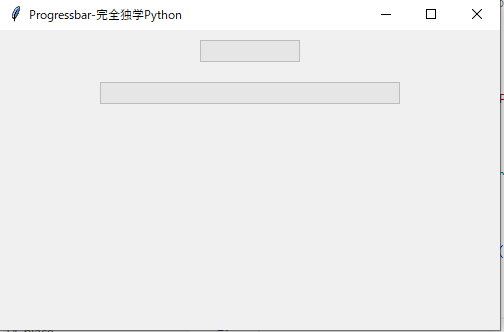
これは単純にバーの長さが調整できる!
GUIのサイズに合わせて調整しよう!
Progressbarの動作モードを指定(mode)
import tkinter as tk
from tkinter import ttk

root = tk.Tk()
root.title("Progressbar-完全独学Python")
root.geometry("500x300")

# 確定的モードのProgressbarを作成し、値を設定
progress_determinate = ttk.Progressbar(root, orient="horizontal", length=200, mode="determinate")
progress_determinate.pack(pady=10)
progress_determinate['value'] = 50

# 不確定的モードのProgressbarを作成し、アニメーションを開始
progress_indeterminate = ttk.Progressbar(root, orient="horizontal", length=200, mode="indeterminate")
progress_indeterminate.pack(pady=10)
progress_indeterminate.start()

root.mainloop()
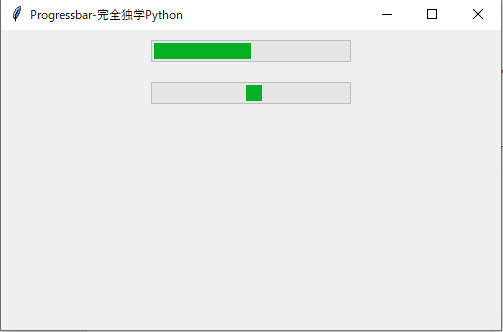
少しわかりにくいけど、「determinate」はバーが埋まっていく、「indeterminate」は□がバー内を移動し続けるイメージ!
最大値があるような作業(ダウンロードは%で示せるように!)はdeterminate、それ以外はindeterminateとするといいかも!
Progressbarの現在の値を設定(value)
import tkinter as tk
from tkinter import ttk

root = tk.Tk()
root.title("Progressbar-完全独学Python")
root.geometry("500x300")

# 現在の値を75に設定したProgressbarを作成
progress = ttk.Progressbar(root, orient="horizontal", length=200, mode="determinate", maximum=100)
progress.pack(pady=20)
progress['value'] = 75

root.mainloop()
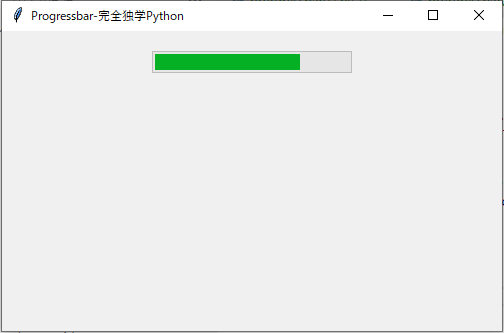
次で紹介するけどmaximum=100(最大値100)としていて、value=75に設定しているので
大体75くらいバーが埋まっているね!
Progressbarの最大値を設定(maximum)
import tkinter as tk
from tkinter import ttk

root = tk.Tk()
root.title("Progressbar-完全独学Python")
root.geometry("500x300")

# 最大値を200に設定したProgressbarを作成
progress = ttk.Progressbar(root, orient="horizontal", length=200, mode="determinate", maximum=200)
progress.pack(pady=20)
progress['value'] = 100  # 現在の値を設定

root.mainloop()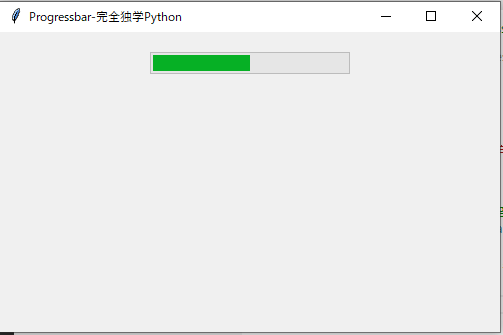
valueを100にしても半分なので最大値が200になっているのがわかるね!
ttk.Progressbarのメソッド
Progressbarのアニメーションを開始(start(interval=None))
import tkinter as tk
from tkinter import ttk

def start_progress():
    progress.start(10)  # アニメーションを開始、10ミリ秒間隔

root = tk.Tk()
root.title("Progressbar-完全独学Python")
root.geometry("500x300")

# 不確定的モードのProgressbarを作成
progress = ttk.Progressbar(root, orient="horizontal", length=200, mode="indeterminate")
progress.pack(pady=20)

# アニメーション開始ボタンを作成
start_button = ttk.Button(root, text="Start", command=start_progress)
start_button.pack(pady=20)

root.mainloop()
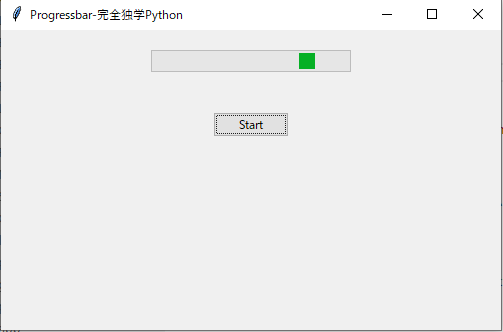
ボタンを押すと、progress.start(10)が発火して、バーが動き出すのがわかるね!
Progressbarのアニメーションを停止(stop())
import tkinter as tk
from tkinter import ttk

def start_progress():
    progress.start(10)  # アニメーションを開始、10ミリ秒間隔

def stop_progress():
    progress.stop()  # アニメーションを停止

root = tk.Tk()
root.title("Progressbar-完全独学Python")
root.geometry("500x300")

# 不確定的モードのProgressbarを作成
progress = ttk.Progressbar(root, orient="horizontal", length=200, mode="indeterminate")
progress.pack(pady=20)

# アニメーション開始ボタンを作成
start_button = ttk.Button(root, text="Start", command=start_progress)
start_button.pack(pady=5)

# アニメーション停止ボタンを作成
stop_button = ttk.Button(root, text="Stop", command=stop_progress)
stop_button.pack(pady=5)

root.mainloop()
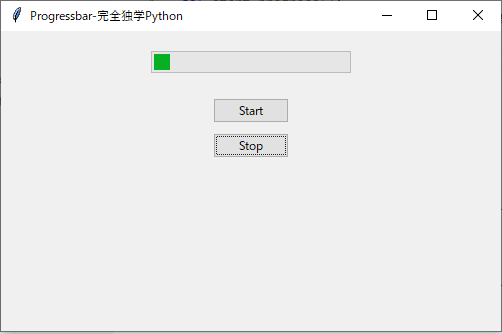
「start」を押した後、「stop」を押すとアニメーションが止まるね!
処理の完了時に動作を止めるときに使える!
Progressbarの値を増加(step(amount=None))
import tkinter as tk
from tkinter import ttk

def step_progress():
    progress.step(10)  # 値を10増加

root = tk.Tk()
root.title("Progressbar-完全独学Python")
root.geometry("500x300")

# 確定的モードのProgressbarを作成
progress = ttk.Progressbar(root, orient="horizontal", length=200, mode="determinate", maximum=100)
progress.pack(pady=20)

# 値を増加させるボタンを作成
step_button = ttk.Button(root, text="Step", command=step_progress)
step_button.pack(pady=20)

root.mainloop()
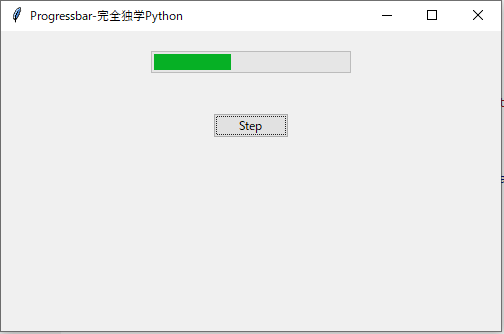
stepで、ボタンを押すと「10」進む機能も作れるよ!
進捗バーだけじゃなくて、いろいろな使い道があるね!
ttk.Progressbarの応用
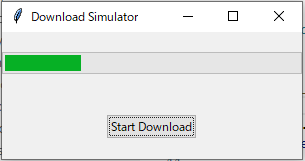
ダウンロードシミュレーター
import tkinter as tk
from tkinter import ttk
import time
import threading
import queue

def download_simulation(queue):
    for i in range(101):
        time.sleep(0.05)  # ダウンロード処理のシミュレーション
        queue.put(i)  # 現在の進行状況をキューに追加

def update_progress():
    try:
        progress = queue.get_nowait()  # キューから進行状況を取得
        progress_var.set(progress)  # Progressbarの値を更新
        if progress < 100:
            root.after(100, update_progress)  # 100ミリ秒後に再度呼び出し
    except queue.Empty:
        root.after(100, update_progress)  # キューが空なら100ミリ秒後に再度呼び出し

def start_download():
    threading.Thread(target=download_simulation, args=(queue,)).start()  # 別スレッドでシミュレーションを実行
    root.after(100, update_progress)  # メインスレッドでProgressbarの更新を開始

root = tk.Tk()
root.title("Download Simulator")

# Progressbarの値を管理するための変数を作成
progress_var = tk.IntVar()
progress = ttk.Progressbar(root, orient="horizontal", length=300, mode="determinate", maximum=100, variable=progress_var)
progress.pack(pady=20)

# ダウンロード開始ボタンを作成
start_button = ttk.Button(root, text="Start Download", command=start_download)
start_button.pack(pady=20)

# スレッド間でデータをやり取りするためのキューを作成
queue = queue.Queue()

root.mainloop()

ダウンロードとは別のスレッド(threading)で進捗バーを動かす機能です!
queueで複数のスレッド間で安全(スレッドセーフ)にやり取りするために使用しているよ!
そのほかは今日の記事で理解できるはず!
挑戦してみてね!
まとめ
本記事では、Progressbarを使って、Tkinterで画面に進捗バーを表示する方法を紹介しました!
ポイントは以下の6つです!
① Tkinterで画面に進捗バーを表示するには「ttk.Progressbar」を使う
② 「orient」メソッドは、Progressbarの方向を指定!
③ 「length」メソッドは、Progressbarの長さを指定!
④ 「mode」メソッドは、Progressbarの動作モードを指定!
⑤ 「maximum」メソッドは、Progressbarの最大値を設定!
⑥ 「value」メソッドは、Progressbarの現在の値を設定!
⑦ 「start(interval=None)」メソッドは、Progressbarのアニメーションを開始!
⑧ 「stop()」メソッドは、Progressbarのアニメーションを停止!
⑨ 「step(amount=None)」メソッドは、Progressbarの値を増加!
まとめの内容を見て、もう頭に浮かべば完璧!
今日もお疲れ様です!

コメント