

こんにちは!ゆーや(@yuyamanm118712)です。
こちらのページでは完全独学でWebプログラマとなった私が
デスクトップアプリには必須!!Tkinterでpackを使ったウィジェットを配置方法を詳しく紹介します!
ほかの配置方法については以下の記事を見てね!

pack()メソッドは、Tkinterでウィジェットを配置するためのレイアウトマネージャの一つです!
Tkinterには主に以下の三つのレイアウトマネージャが存在します。
- pack()
- grid()
- place()
これらの中でpack()は、ウィジェットを親ウィンドウまたはフレーム内に順次配置していくシンプルな方法です!
pack()メソッドは簡単にウィジェットを配置するための方法として初心者に最適です!
本記事を通してしっかり学んでおきましょう!
この記事を読むと
- Tkinterでの「pack」について基本が理解できる!
- Tkinterでの「pack」の様々なオプションについて理解できる!
pack()の基本的な使い方
packの使い方の基本とサンプルコード
import tkinter as tk

root = tk.Tk()
root.title("Pack-完全独学Python")
root.geometry("500x300")

# ラベルの作成と配置
label = tk.Label(root, text="Hello, Tkinter!")
label.pack()

# ボタンの作成と配置
button = tk.Button(root, text="Click Me")
button.pack()

root.mainloop()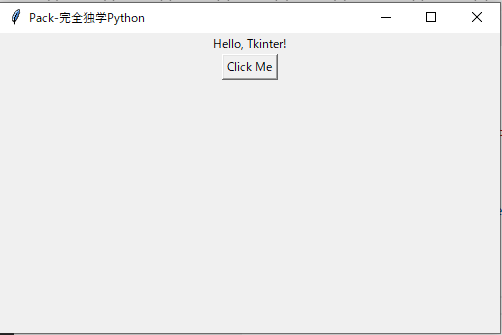
ラベルとボタンが作成され、それぞれが順番にウィンドウ内に配置されるよ!pack()メソッドを使用することで、これらのウィジェットは自動的に親ウィンドウ(この場合はroot)の中央に配置されることに注意!
packのオプション
親ウィンドウのどの辺に配置するか(side)
import tkinter as tk

root = tk.Tk()
root.title("Pack-完全独学Python")
root.geometry("500x300")

label_top = tk.Label(root, text="Top Label")
label_top.pack(side=tk.TOP)

label_bottom = tk.Label(root, text="Bottom Label")
label_bottom.pack(side=tk.BOTTOM)

label_left = tk.Label(root, text="Left Label")
label_left.pack(side=tk.LEFT)

label_right = tk.Label(root, text="Right Label")
label_right.pack(side=tk.RIGHT)

root.mainloop()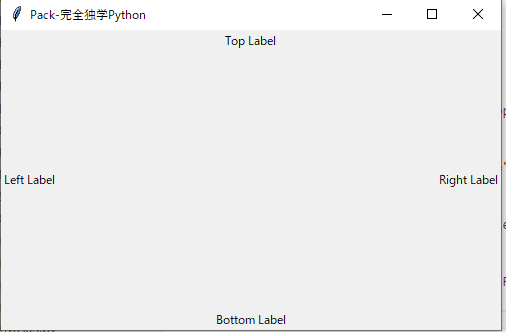
tk.TOP、tk.BOTTOM、tk.LEFT、tk.RIGHTの4つ!
デフォルトではtk.TOPに配置されるよ!
親ウィンドウ内でどの方向に広がるか(fill)
import tkinter as tk

root = tk.Tk()
root.title("Pack-完全独学Python")
root.geometry("500x300")

# ラベルの作成と配置(横方向に広がる)
label_fill_x = tk.Label(root, text="Fill X", bg="lightblue")
label_fill_x.pack(fill=tk.X, padx=5, pady=5)

# ラベルの作成と配置(縦方向に広がる)
label_fill_y = tk.Label(root, text="Fill Y", bg="lightgreen", height=5)
label_fill_y.pack(fill=tk.Y, padx=5, pady=5)

# ラベルの作成と配置(両方向に広がる)
label_fill_both = tk.Label(root, text="Fill Both", bg="lightcoral")
label_fill_both.pack(fill=tk.BOTH, expand=True, padx=5, pady=5)

root.mainloop()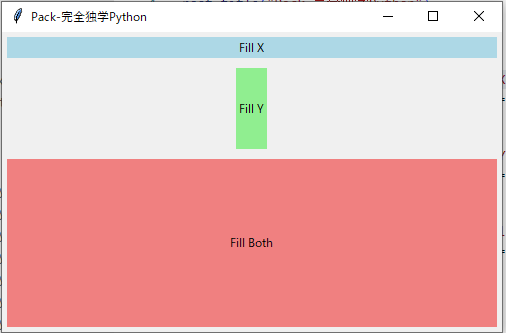
tk.NONE(デフォルト)、tk.X、tk.Y、tk.BOTHの4つの値を取るよ!
親ウィンドウの残りのスペースをどのように埋めるか(expand)
import tkinter as tk

root = tk.Tk()
root.title("Pack-完全独学Python")
root.geometry("500x300")

# ラベルの作成と配置(expandを指定しない場合)
label_no_expand = tk.Label(root, text="No Expand", bg="lightblue")
label_no_expand.pack(fill=tk.BOTH, padx=5, pady=5)

# ラベルの作成と配置(expand=True)
label_expand = tk.Label(root, text="Expand", bg="lightgreen")
label_expand.pack(fill=tk.BOTH, expand=True, padx=5, pady=5)

root.mainloop()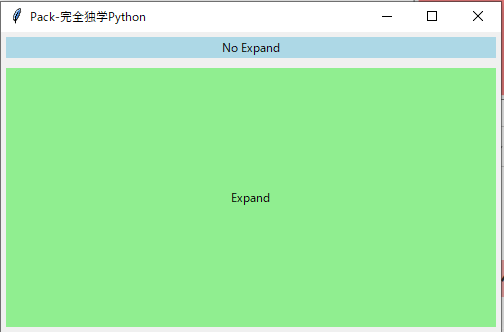
TrueまたはFalseのいずれかの値を取るよ!
確かにTrueとした2つ目のlabelはウィンドウを埋めてくれてるね!
違いが分かりにくい人はFalseにしてみてね!
ウィジェットの左右と上下に余白を追加(padx, pady)
import tkinter as tk

root = tk.Tk()
root.title("Pack-完全独学Python")
root.geometry("500x300")

# padxのみを指定
label_padx = tk.Label(root, text="Padding X", bg="lightblue")
label_padx.pack(padx=20)

# padyのみを指定
label_pady = tk.Label(root, text="Padding Y", bg="lightgreen")
label_pady.pack(pady=20)

# 両方を指定
label_padx_pady = tk.Label(root, text="Padding X and Y", bg="lightcoral")
label_padx_pady.pack(padx=20, pady=20)

root.mainloop()
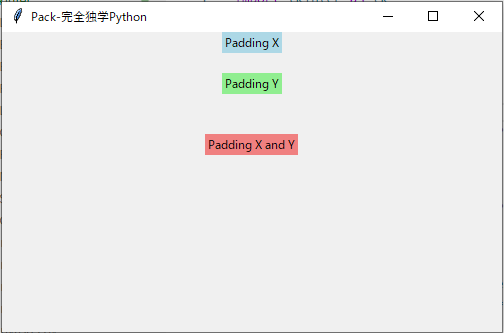
値の指定はピクセル単位だよ!
GUIをきれいにするためには余白をそろえることも重要だから覚えておいてね!
ウィジェットが配置される際の基準点を指定(anchor)
import tkinter as tk

root = tk.Tk()
root.title("Pack-完全独学Python")
root.geometry("500x300")

# 上部中央に配置 (デフォルト)
label_center = tk.Label(root, text="Center (default)", bg="lightblue")
label_center.pack(anchor=tk.CENTER, pady=10)

# 左上に配置
label_nw = tk.Label(root, text="NW (North West)", bg="lightgreen")
label_nw.pack(anchor=tk.NW, pady=10)

# 右上に配置
label_ne = tk.Label(root, text="NE (North East)", bg="lightcoral")
label_ne.pack(anchor=tk.NE, pady=10)

# 左下に配置
label_sw = tk.Label(root, text="SW (South West)", bg="lightyellow")
label_sw.pack(anchor=tk.SW, pady=10)

# 右下に配置
label_se = tk.Label(root, text="SE (South East)", bg="lightgrey")
label_se.pack(anchor=tk.SE, pady=10)

root.mainloop()
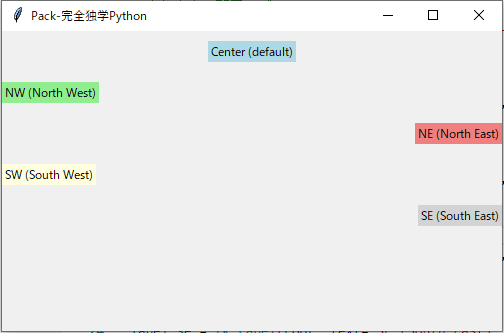
値には、tk.N(北)、tk.S(南)、tk.E(東)、tk.W(西)、およびそれらの組み合わせ(例:tk.NE、tk.SW)を指定できる!
Frameなどと組み合わせればいろいろなGUIが作れるよ!
Frameってなんだっけ?という方は以下の記事を見てね!
応用
複数のオプションを組み合わせる
import tkinter as tk

root = tk.Tk()
root.title("Pack-完全独学Python")
root.geometry("500x300")

# 背景をカラフルにするためにフレームを使用
frame_top = tk.Frame(root, bg="skyblue")
frame_bottom = tk.Frame(root, bg="lightgrey")

frame_top.pack(fill=tk.BOTH, expand=True)
frame_bottom.pack(fill=tk.BOTH, expand=True)

# 上部フレームに配置されるラベル
label_top_left = tk.Label(frame_top, text="Top Left", bg="lightgreen")
label_top_left.pack(side=tk.LEFT, padx=20, pady=10, anchor=tk.NW)

label_top_center = tk.Label(frame_top, text="Top Center", bg="lightcoral")
label_top_center.pack(side=tk.TOP, padx=10, pady=10, anchor=tk.N)

label_top_right = tk.Label(frame_top, text="Top Right", bg="lightyellow")
label_top_right.pack(side=tk.RIGHT, padx=20, pady=10, anchor=tk.NE)

# 下部フレームに配置されるラベル
label_bottom_left = tk.Label(frame_bottom, text="Bottom Left", bg="lightblue")
label_bottom_left.pack(side=tk.LEFT, padx=20, pady=10, anchor=tk.SW)

label_bottom_center = tk.Label(frame_bottom, text="Bottom Center", bg="lightpink")
label_bottom_center.pack(side=tk.BOTTOM, padx=10, pady=10, anchor=tk.S)

label_bottom_right = tk.Label(frame_bottom, text="Bottom Right", bg="lightgrey")
label_bottom_right.pack(side=tk.RIGHT, padx=20, pady=10, anchor=tk.SE)

root.mainloop()
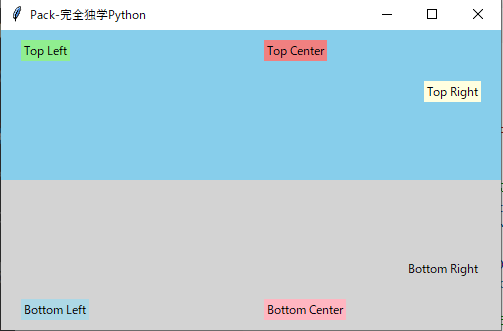
こんな風にpackだけでも割と自由にGUIを作れる!
上のソースをいろいろいじってみて、packをマスターしよう!
まとめ
本記事では、packの使い方とそのオプションについて紹介しました!
ポイントは以下の6つです!
① 「pack」はTkinterでウィジェットを配置する一番シンプルな方法!
② 「side」オプションは、ウィジェットを親ウィンドウのどの辺に配置するかを指定!
③ 「fill」オプションは、ウィジェットが親ウィンドウ内でどの方向に広がるかを指定!
④ 「expand」オプションは、ウィジェットが親ウィンドウの残りのスペースをどのように埋めるかを指定!
⑤ 「padx, pady」オプションは、それぞれウィジェットの左右と上下に余白を追加!
⑥ 「anchor」オプションは、ウィジェットが配置される際の基準点を指定!
まとめの内容を見て、もう頭に浮かべば完璧!

コメント